
 Tweet
Tweet
copied from another forum. note this is not the same for all differentials
There are 4 basic measurements you need to get.
1) Pinion Depth
2) Backlash
3) Pinion Bearing preload
4) Carrier bearing preload
Start by removing the differential cover. Make sure you got some kind of pan underneath the axle; gear oil is going to go everywhere. Once you get this far, spin the carrier around until you see the Cross shaft bolt shown here...
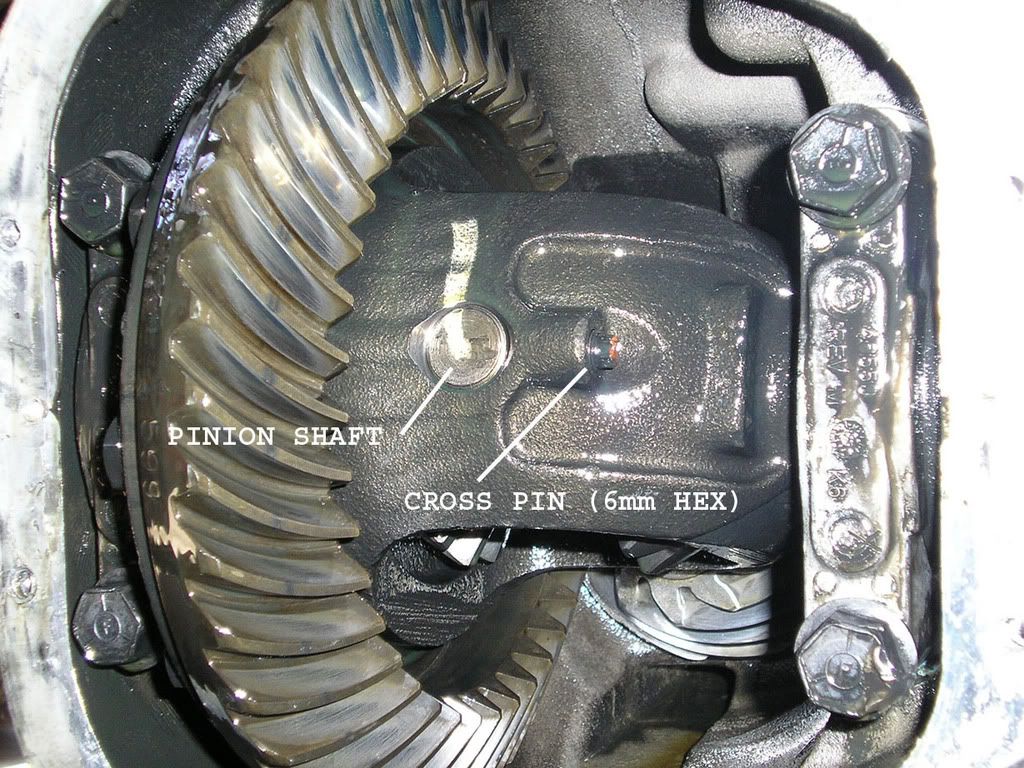
With the cross shaft removed the C-Clip port should be in view, Push one of the axles inward (from the side of the axle), which will reveal the c-clip, remove it. Use needle nosed pliers (or just your hands) to pull the C-clips out. Once the c-clips are removed the axle shafts can be pulled. When you go to pull out the axle shafts, be careful not to put too much stress the bearing seal at the end of the axle tube. Do this for both sides.
Remove the four big bolts that hold the carrier bearing caps on (shown below), then try and pull on the carrier/ring gear, to where it will pop out. If it’s too tight to be tugged out, a crow-bar to peal out the carrier. You can pry against ring gear bolts on the backside of the carrier. If you tug right on its sweet spot, you can get the carrier all the way out in just one tug, on one side... if you jar up the carrier (i mean, sort of jamming it side-to-side, which you will probably do your first couple times) you will have to pry from the opposite side (which has no bolts to pry on ). Use a piece of wood to wedge the crow bar on, so you don’t ding up the axle housing. Try and not ding up the carrier too much, because it’s easy to make junk out it.
Make sure mark the bearing caps between right and left. Those caps are machined to match the housing and do not interchange. If you mix them up you can compare the texture of the machined surface on the cap to the texture in the house. Take notice of the tapered sides of the caps, this will contrast to the tapering on the housing
Setting up Backlash
Now you want to measure the backlash by putting the dial indicator on the very edge of a tooth on the ring gear, you want the indicator to be perpendicular to the edge of the tooth as you possibly can. If you look closely, some gear manufacturers make a little tapered edge on this section of the teeth, using this area makes pointing the dial indicator very accurate.
The backlash is the amount of slop in between the ring gear and the pinion; you are measuring that distance. (.008"-.015") is the amount you want. You are going to move the carrier left and right by using the shims in your install kit. . You want to keep this balance so your backlash stays consistent. Make sure you torque the bearing caps to 77ftlbs before checking your pattern...
Are your shims pissing you off because they won’t stay in the housing when you try to install the carrier? I have a little trick for you! Coat the shim flanges and shims in gear oil so it can sort of glue them together. This is a great time saver.
The pinion depth is the next measurement you need to look at. Put some gear marking compound on a couple teeth and turn the pinion to get a little pattern.
You don't need to use a crush sleeve each time you remove the pinion to change shims. It can make things tedious for you and possibly give you a false preload, but most of all leaving the sleeve out teaches you what 16inlbs should feel like. As long the torque it takes to turn the pinion is the same as when you go to set up your final assembly with a crush sleeve, pinion depth will be the same. Just make sure to check it, when you are trying to get a feel for it.
In general, when you are setting up gears you are mainly trying to measure from the face to the flank of the tooth, a perfect heel to toe pattern usually impractical. The reason i say this is because all housings are different.
If your pattern seems way too close to the toe, then subtract some shim thickness from your pinion shim. If you are closer to the heel, Add shims. Usually (especially in smaller gear jumps like 3.55 to 4.10) the stock pinion shim should be perfect. My stock pinion shim was a good starting point; with a Jump from 3.27 to 4.56 I was barely too close to the toe for my liking. I dropped the pinion shim by -.002 and it was perfect from there. Remove the carrier and add/subtract the amount in shims on your stock pinion shim to get your pattern
Check your pattern again, and if you like what you got then you basically done! The chart below, taken from the Yukon gear manual, should be able to help you determine the pattern. The pattern is going to be difficult to read on the coast side (a.k.a ghost side) during trial assemblies, or until you adjust the preload on the pinion and carrier bearings. After the preloads' have been set the pattern should be nice and defined. There should be a nice shaped oval centered between face and flank on the drive side, and on the ghost side there should be a nice swoop across the back of the gear, again centered face to flank.


There are 4 basic measurements you need to get.
1) Pinion Depth
2) Backlash
3) Pinion Bearing preload
4) Carrier bearing preload
Start by removing the differential cover. Make sure you got some kind of pan underneath the axle; gear oil is going to go everywhere. Once you get this far, spin the carrier around until you see the Cross shaft bolt shown here...
With the cross shaft removed the C-Clip port should be in view, Push one of the axles inward (from the side of the axle), which will reveal the c-clip, remove it. Use needle nosed pliers (or just your hands) to pull the C-clips out. Once the c-clips are removed the axle shafts can be pulled. When you go to pull out the axle shafts, be careful not to put too much stress the bearing seal at the end of the axle tube. Do this for both sides.
Remove the four big bolts that hold the carrier bearing caps on (shown below), then try and pull on the carrier/ring gear, to where it will pop out. If it’s too tight to be tugged out, a crow-bar to peal out the carrier. You can pry against ring gear bolts on the backside of the carrier. If you tug right on its sweet spot, you can get the carrier all the way out in just one tug, on one side... if you jar up the carrier (i mean, sort of jamming it side-to-side, which you will probably do your first couple times) you will have to pry from the opposite side (which has no bolts to pry on ). Use a piece of wood to wedge the crow bar on, so you don’t ding up the axle housing. Try and not ding up the carrier too much, because it’s easy to make junk out it.
Make sure mark the bearing caps between right and left. Those caps are machined to match the housing and do not interchange. If you mix them up you can compare the texture of the machined surface on the cap to the texture in the house. Take notice of the tapered sides of the caps, this will contrast to the tapering on the housing
Setting up Backlash
Now you want to measure the backlash by putting the dial indicator on the very edge of a tooth on the ring gear, you want the indicator to be perpendicular to the edge of the tooth as you possibly can. If you look closely, some gear manufacturers make a little tapered edge on this section of the teeth, using this area makes pointing the dial indicator very accurate.
The backlash is the amount of slop in between the ring gear and the pinion; you are measuring that distance. (.008"-.015") is the amount you want. You are going to move the carrier left and right by using the shims in your install kit. . You want to keep this balance so your backlash stays consistent. Make sure you torque the bearing caps to 77ftlbs before checking your pattern...
Are your shims pissing you off because they won’t stay in the housing when you try to install the carrier? I have a little trick for you! Coat the shim flanges and shims in gear oil so it can sort of glue them together. This is a great time saver.
The pinion depth is the next measurement you need to look at. Put some gear marking compound on a couple teeth and turn the pinion to get a little pattern.
You don't need to use a crush sleeve each time you remove the pinion to change shims. It can make things tedious for you and possibly give you a false preload, but most of all leaving the sleeve out teaches you what 16inlbs should feel like. As long the torque it takes to turn the pinion is the same as when you go to set up your final assembly with a crush sleeve, pinion depth will be the same. Just make sure to check it, when you are trying to get a feel for it.
In general, when you are setting up gears you are mainly trying to measure from the face to the flank of the tooth, a perfect heel to toe pattern usually impractical. The reason i say this is because all housings are different.
If your pattern seems way too close to the toe, then subtract some shim thickness from your pinion shim. If you are closer to the heel, Add shims. Usually (especially in smaller gear jumps like 3.55 to 4.10) the stock pinion shim should be perfect. My stock pinion shim was a good starting point; with a Jump from 3.27 to 4.56 I was barely too close to the toe for my liking. I dropped the pinion shim by -.002 and it was perfect from there. Remove the carrier and add/subtract the amount in shims on your stock pinion shim to get your pattern
Check your pattern again, and if you like what you got then you basically done! The chart below, taken from the Yukon gear manual, should be able to help you determine the pattern. The pattern is going to be difficult to read on the coast side (a.k.a ghost side) during trial assemblies, or until you adjust the preload on the pinion and carrier bearings. After the preloads' have been set the pattern should be nice and defined. There should be a nice shaped oval centered between face and flank on the drive side, and on the ghost side there should be a nice swoop across the back of the gear, again centered face to flank.


 Vice President of Internal Affairs at Dirty Donny's House of Hookers
Comment